Transplant Shock: Why Starts Struggle and How to Help Them Recover
- John Shriver
- Feb 16
- 6 min read
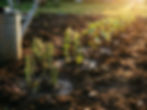
You did everything right. You picked out healthy starts at the nursery, brought them home in the shade of the back seat, dug careful holes in the bed you spent weeks preparing, watered everything in, and stood back feeling good about the whole operation. Two days later, every plant in the row is wilting.
The instinct at that point is to water again, or grab a bottle of fertilizer, or wonder whether you got a bad batch. None of those are quite the right response. What you're looking at is transplant shock, and it's one of the most predictable events in a garden season. Nearly every start goes through some version of it. Understanding what's happening underground during those first few days changes both how you respond and how many of your transplants actually make it to harvest.
What's Actually Happening When a Transplant Wilts
Root Disturbance and the Absorption Gap
When a start comes out of its cell pack or nursery pot, the fine root hairs that do most of the work of absorbing water and nutrients get torn or left behind in the old soil. These aren't the thick roots you can see; they're microscopic structures that grow at the very tips, and they're fragile. The problem is that the leaves above are still losing water at the same rate they always were. Wilting is what happens when the damaged root system can no longer deliver moisture fast enough to keep up with what the foliage is spending.
New root hairs need to grow outward into the surrounding soil before the plant can fully support itself again. That process takes days, sometimes a week or more. This is the vulnerable window.
Microbiome Disruption
There's a less visible layer to the problem. Starts grown in nursery conditions develop a microbial community around their roots that's adapted to the greenhouse environment: the specific potting mix, the watering schedule, the temperature. When that root ball goes into garden soil with a completely different microbial profile, the plant loses some of the biological partnerships it was relying on for nutrient access and disease defense. The root zone has to build new relationships in unfamiliar ground, and that takes time on top of the physical recovery already underway.
Environmental Mismatch
A greenhouse offers stable temperatures, consistent moisture, filtered light, and no wind. A garden bed in Portland in late March offers cool nights, sideways rain, direct sun between clouds, and exposure on all sides. The gap between those two environments is considerable, and the plant is dealing with it at the same time its root system is compromised. The layering of physical root damage, biological disruption, and environmental stress is what makes those first few days so hard on transplants.
How to Give Transplants the Best Start
Hardening Off: Closing the Gap Before Planting Day
If your starts came from a greenhouse, they haven't experienced outdoor conditions. Hardening off is the process of introducing them gradually over five to seven days. Set them outside in a sheltered, shaded spot for a few hours the first day, then increase the time and sun exposure each day after. Bring them in or cover them if nighttime temperatures drop below what the crop tolerates.
It's a step that's easy to skip because it feels slow when you're eager to plant. It makes a real difference in transplant survival, especially for warm-season crops going out in May. Worth noting: starts purchased at Portland farmers markets and local nurseries may already be partially hardened if they've been displayed outdoors. It's worth asking the grower.
Planting Technique That Protects Roots
A few details during the physical act of planting reduce the severity of shock considerably.
Water the starts in their pots an hour or two before transplanting. Moist root balls hold together better, and damp roots are more flexible and less prone to snapping. When you dig the hole, make it wider than the root ball, not just deep enough. Roots that hit a hard wall of compacted soil at the edge of a narrow hole will circle rather than spread, and circling roots slow establishment.
Handle the root ball gently. If roots are circling from sitting in a cell pack too long, tease them apart lightly with your fingers, but don't pull them apart aggressively. You're trying to redirect growth, not strip the root system.
Add a handful of Vermi-Compost to the planting hole and mix it into the surrounding backfill soil. The beneficial microbes in worm castings begin colonizing the root zone immediately, giving the transplant access to a functioning biological community from the moment it goes in the ground rather than waiting weeks for the existing soil biology to find its way to the roots. This directly addresses the microbiome disruption that slows establishment. A small handful per planting hole, mixed into the soil around the root ball, is enough. Don't layer it at the bottom where roots won't reach it right away.
Set the plant at the same depth it was growing in its container. Burying the stem invites rot on most vegetable crops (tomatoes are a notable exception). Backfill, press the soil gently to close air pockets, and water thoroughly to settle everything into contact with the roots.
Timing and Conditions
Transplant on a cloudy day or in the late afternoon. Giving the plant a full night to begin settling before it faces direct sun and wind reduces the initial stress. Avoid planting right before a heavy rain if you can; waterlogged soil around damaged roots compounds the problem rather than helping.
Soil temperature matters as much as air temperature. Warm-season starts planted into soil still below 60°F will stall because root growth is temperature-dependent. Even if the air feels warm during a sunny April afternoon, the soil may not have caught up. If you followed the soil temperature guidance in our bed prep walkthrough, you already have a sense of where your beds stand.
Supporting a Transplant That's Already Struggling
Water Carefully, Not Constantly
A wilting plant triggers the impulse to keep watering, but overwatering a transplant whose roots are already compromised creates saturated conditions that prevent recovery and invite rot. Water deeply at planting time, then let the top inch of soil dry before watering again. The goal is consistent moisture without standing water around the root zone.
If a plant wilts in midday sun but firms up by evening, that's a normal adjustment. The roots can't quite keep pace with daytime water loss yet, but they're functioning. If the plant stays wilted into the next morning, the root damage may be more significant and recovery will take longer.
Provide Temporary Shade and Wind Protection
A piece of shade cloth, an overturned nursery flat propped on sticks, or a board leaned at an angle on the south side of the plant can reduce sun and wind exposure for the first three to five days. The idea is simple: slowing the rate of water loss through the leaves gives the roots time to catch up. Remove the protection gradually so the plant acclimates to full outdoor conditions rather than facing another abrupt transition.
A Biostimulant Drench to Support Root Recovery
A soil drench with Vermi-Tea at planting time and again three to five days later delivers beneficial microbes and natural growth-promoting compounds directly to the root zone during the window when the plant needs them most. The microbial community supports nutrient cycling while roots are still rebuilding their capacity, and the plant growth hormones present in vermicompost tea encourage new root development at the tips where absorption happens.
This isn't a rescue product. It works alongside proper planting technique, appropriate watering, and temporary shade as the biological complement to the physical care. Research on vermicompost applications during transplanting has consistently shown improved root development and faster establishment. For readers interested in the science behind how those microbial communities support root health, we've covered that in detail.
What Recovery Looks Like (and When to Worry)
Most transplants show visible wilting or stalling for three to seven days after planting. The clearest signal that a plant has established is new growth appearing at the growing tip, which typically happens within one to two weeks. For warm-season crops transplanted into cool soil, that timeline stretches, so adjust your expectations based on when you planted.
Signs that recovery is on track: the plant stops wilting overnight, new leaves begin emerging, and stems feel firm when you touch them. Signs that something more serious is going on: continued wilting after a full week with adequate soil moisture, stems that feel soft or mushy at the soil line, or leaves yellowing progressively from the bottom up. At that point, it's worth gently checking the root zone for rot or pest damage.
Most transplants recover. The ones that don't usually faced a combination of root damage and environmental stress that exceeded their capacity to bounce back. That's not a single mistake you made. It's a reminder that gardening involves working with living systems that have limits, and that even experienced growers lose a few starts every spring.
From Transplant to Harvest
Getting starts into prepared beds and through those first vulnerable days is one of the pivotal transitions in a growing season. The bed preparation work you did in March built the foundation. Successful transplanting is the next step, and once your plants are established and putting on new growth, the focus shifts to feeding and supporting them through the productive months ahead. For readers growing tomatoes, we cover the full-season feeding approach in a different post, from planting through harvest, with guidance tailored to Portland's shorter, cooler growing season.
Vermi-Compost and Vermi-Tea are available through our shop and at Portland-area farmers markets.